To move away from a shared Apple ID for iMessage, sign out of the shared ID and create or sign into a personal one. Next, adjust the iMessage settings to use the new Apple ID.
Sharing an Apple ID for iMessage can create privacy issues and message confusion across devices. This is why many users opt for individual Apple IDs. Transitioning to a personal Apple ID for iMessage is a straightforward process that increases personal privacy and ensures message security.
Establishing a unique Apple ID allows you to maintain control over your messages and offers a personalized experience with Apple services. With a few simple steps in the settings of your iOS device, you can protect your iMessage content and seamlessly integrate with your personal Apple ecosystem. Keep in mind that the transition should preserve your message history while providing a fresh start with your personal Apple ID.
Contents
- 1 The Perils Of A Shared Apple Id
- 2 Assessing Your Current Apple Id Setup
- 3 Preparation For Imessage Separation
- 4 Creating Individual Apple Ids
- 5 Disconnecting Your Device From The Shared Apple Id
- 6 Transferring Purchased Content
- 7 Managing Old Conversations And Data
- 8 After The Switch: Optimizing Your New Setup
- 9 Troubleshooting Common Issues Post-separation
- 10 Maintaining Digital Privacy And Security
- 11
- 12 Frequently Asked Questions
- 13 Conclusion
The Perils of a Shared Apple ID: Sharing an Apple ID might seem convenient for families or close friends. It simplifies many digital tasks. Yet, this practice carries risks that can disrupt your digital life. Understanding these risks helps you decide to move away from a shared Apple ID, especially for services like iMessage.
Privacy is a top concern with shared Apple IDs. All messages are viewable by everyone who shares the ID.
- Texts meant for you could pop up on someone else’s device.
- Personal conversations are not private anymore. They become accessible to the group.
- Sensitive information, like OTPs or confidential chats, could be at risk.
Using one’s unique Apple ID for iMessage keeps texts between the sender and intended receiver.
Purchasing apps under one Apple ID can lead to complications too.
| Issue | Impact |
|---|---|
| Accidental purchases | One person might buy an app not needed by others. |
| Losing access | Changing the Apple ID means loss of access to these apps. |
| Update prompts | Update requests can pop up on all devices, causing disruptions. |
Having an individual Apple ID eliminates these issues. Everyone controls their app purchases.
Assessing Your Current Apple Id Setup
Assessing Your Current Apple ID Setup begins with a critical look at how the shared Apple ID is currently being used. It’s important to pinpoint exactly which devices and services are linked. This ensures a smooth transition to individual Apple IDs for iMessage and other Apple services. Let’s delve into the steps you’ll need to take.
To start, list all devices sharing the Apple ID. Check iPhones, iPads, Macs, and iPods.
- Open Settings on each iOS device.
- Click Apple ID at the top.
- Note all devices under “Where You’re Logged In.”
On a Mac:
- Click the Apple Menu.
- Select System Preferences.
- Check the Apple ID section.
Tip: Write down all devices sharing the ID for later steps.
Understanding The Syncing Across Devices
Grasp how the shared Apple ID syncs data across devices. This includes messages, contacts, photos, and more.
Data synced can vary based on settings:
| Service | Sync Option |
|---|---|
| iMessage | On/Off |
| Contacts | On/Off |
| Photos | iCloud Photo Library |
| Calendars | iCloud Sharing |
Notable Point: Turning off syncing on one device won’t affect the others until the Apple ID is removed.
Preparation For Imessage Separation
Welcome to the guide on preparing for iMessage separation when moving away from a shared Apple ID. The shift to a personal Apple ID is a smart decision for privacy and organization. Prior planning will ensure a smooth transition for your iMessage history and contacts. Here’s how to prepare effectively.
Backing Up Important Data
Securing your iMessage history is vital. Start by backing up all messages you wish to keep. Use iCloud or iTunes for backup:
- For iCloud: Go to Settings > [Your Name] > iCloud > iCloud Backup.
- Ensure iMessage is on. Tap Back Up Now.
- For iTunes: Connect your iPhone to a computer. Open iTunes, select your device. Click Back Up Now.
Notifying Contacts About The Change
Inform your contacts about your new Apple ID. Prevent confusion by keeping them in the loop:
- Send a simple message stating your new contact details.
- Create a group message or use social media for quick notification.
- Remember to update your contact information in their devices.
Creating Individual Apple Ids
Many families and friends often share one Apple ID for convenience. Yet, there comes a time when individual accounts are necessary. It’s easy to switch from a shared Apple ID to personal ones for iMessage. Doing so enhances privacy and personalizes user experience.
Step-by-step Account Creation
Let’s begin with crafting your unique Apple ID. Doing this is crucial before any other step.
- Visit the Apple ID website (appleid.apple.com).
- Click “Create Your Apple ID”.
- Fill in your name, birthday, email, and password.
- Select a security question and provide an answer.
- Complete the captcha to prove you’re not a robot.
- Check your email for a verification code.
- Enter this code on the Apple ID site to verify your account.
Tip: Choose an email that you use regularly. Make your password strong but memorable.
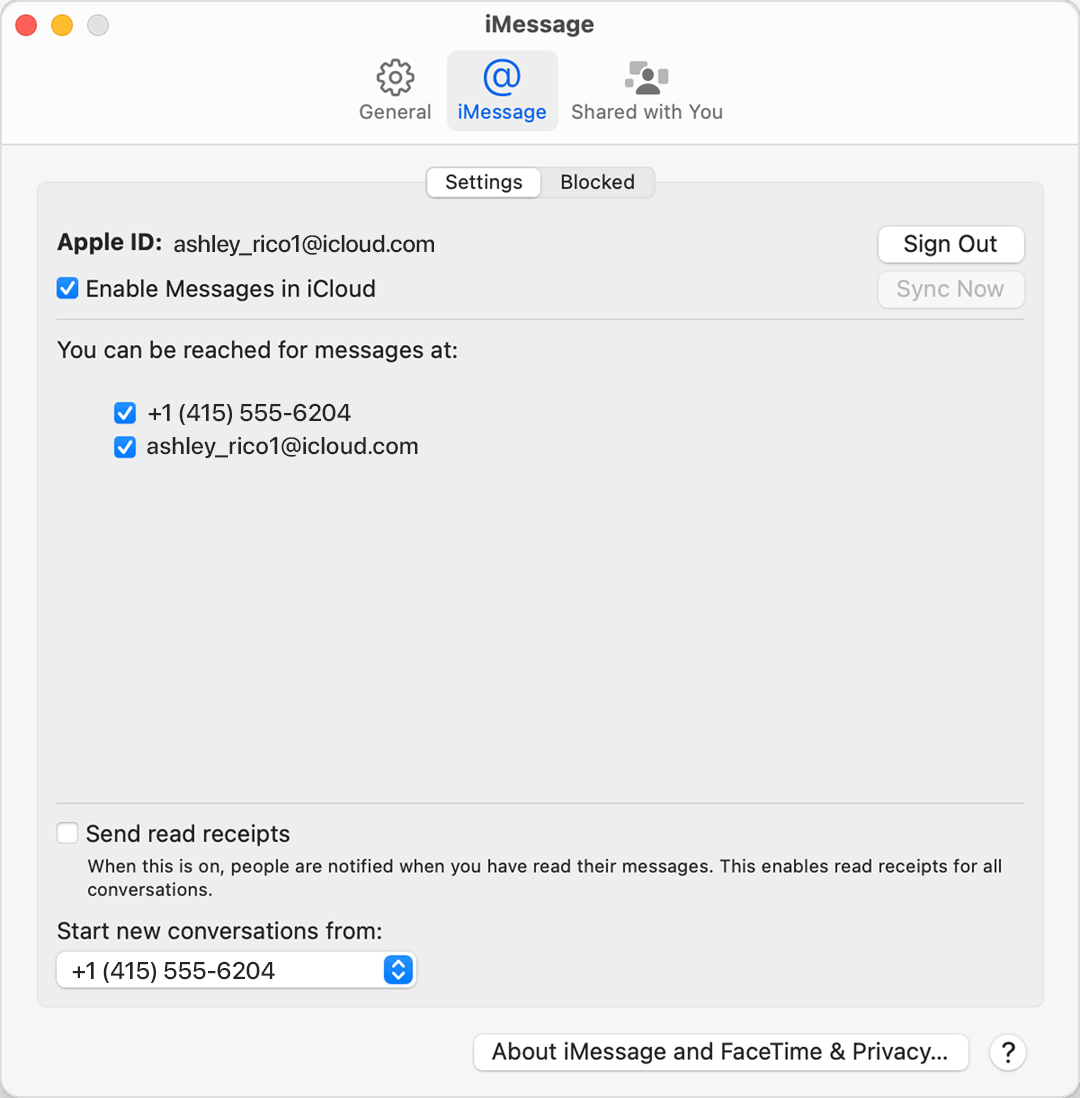
Setting Up New Imessage On Each Device
Now, set up your new Apple ID on your devices. This will get iMessage running separately from the shared ID.
- Open Settings on your iOS device.
- Tap your name (or the current shared Apple ID).
- Scroll down and select “Sign Out”.
- Enter the password for the shared Apple ID to disable Find My iPhone.
- Choose whether to keep a copy of your data.
- Sign back in with your new Apple ID.
- Go to Settings > Messages and toggle on iMessage.
Note: Wait a few moments for activation. Your messages will now send from your personal Apple ID.
Embark on a fresh journey with your individual iMessage account!
Using a shared Apple ID for iMessage can lead to mixed-up contacts and privacy concerns. To maintain your privacy and streamline your messaging experience, it’s important to use a personal Apple ID. Below are simple steps to disconnect your device from a shared Apple ID effectively.
Signing Out Of Imessage
To start the process, sign out of iMessage. This stops all new messages from going to the shared account. Here’s what to do:
- Open the Settings app on your device.
- Scroll down to Messages.
- Tap on Send & Receive.
- Press the Apple ID at the top of the screen.
- Choose Sign Out.
Resetting Imessage Settings
After signing out, reset iMessage settings on your device. This ensures a fresh start. Follow these steps:
- Go back to the Messages settings.
- Toggle off iMessage.
- Restart your device.
- Return to Messages settings.
- Toggle on iMessage again.
Now, your device is ready for a new, personal Apple ID. Your privacy is secured and conversations are strictly yours.
Transferring Purchased Content
Ready to break free from the shared Apple ID conundrum for iMessage and everything else Apple? Stepping into your individual Apple cosmos involves a crucial aspect – Transferring Purchased Content. You’ll need a keen strategy to retain all your precious apps and media. We’ll walk you through handling previously purchased apps and harnessing Family Sharing for seamless access to shared media.
Handling Previously Purchased Apps
Moving away from a shared Apple ID does not mean leaving your apps behind. Keep all your apps – here’s how:
- Create your own new Apple ID.
- Sign into the App Store with your new ID.
But what about the apps you bought or downloaded before? Apple lets you transfer some purchases. For apps that don’t allow transfers, you can still use them on the original device, or repurchase them if needed.
Note: Some content might not be transferable due to licensing restrictions.- Open Settings on your iOS device.
- Tap on your name, then choose Family Sharing.
- Follow the on-screen instructions to invite members.
Once setup, you’ll enjoy access to each other’s purchased music, movies, books, and more.
| Your Apple ID | Family Member’s Apple ID |
|---|---|
| Personal App Purchases | Access Shared App Purchases |
| Own Media Library | Access Shared Media Libraries |
Managing Old Conversations And Data
Shifting away from a shared Apple ID on iMessage means taking care of your previous chats. It’s important to keep your memories intact. Here’s a safe path to manage your old conversations and their data.
Retrieving Past Imessages
Accessing old messages is straightforward after a change in Apple ID. First, open the iMessage app. Look for the search bar and type in keywords. This will help you find the past iMessages you’re looking for.
- Select the conversation.
- Tap on ‘More’.
- Click ‘Export’ to save your conversation.
Remember to backup your iPhone regularly. This ensures that you do not lose any important information during the transition.
Dealing With Archived Information
When archiving is in play, extra steps are necessary. Preserve your data before moving to a new ID.
- Go to Settings, then ‘Messages’.
- Find ‘Keep Messages’.
- Select the duration you want to keep your messages.
You can save your archives by syncing them to iCloud. First, ensure the toggle for Messages is on. Then, sign in with your new Apple ID.
| Action | Path to Follow |
|---|---|
| Backup Messages | Settings > iCloud > Backup |
| Export Chats | iMessage App > Conversation > More > Export |
Be patient as some of these steps may take a few moments. Your messages are important. This care will keep your conversations secure.
After The Switch: Optimizing Your New Setup
Moving from a shared Apple ID to your private ID for iMessage is a smart move. Now, let’s make your experience with iMessage even better. Follow these simple steps to optimize your new setup. Your messages and notifications will work just the way you want.
Adjusting Notification Settings
Control what you see and hear when messages arrive. Change your notification settings with ease.
- Go to Settings on your iPhone or iPad.
- Tap Notifications, then select Messages.
- Customize alerts, sounds, and badges to your liking.
Enjoy notifications that fit your life, from quiet alerts to bold banners.
Ensuring Seamless Synchronization
Keep your conversation up to date across all your devices. Make sure synchronization works without a hitch.
- Open Settings and tap on your Apple ID at the top.
- Select iCloud.
- Toggle on Messages to enable iCloud sync.
Messages now update automatically wherever you use iMessage. Your chats stay current, on every device.
Troubleshooting Common Issues Post-separation
Moving away from a shared Apple ID for iMessage is old-school tech magic. You separate digital lives but sometimes face a couple of hiccups. Let’s dive into troubleshooting these!
Resolving Message Delivery Errors
Message delivery errors can confuse your iPhone after changing IDs. Here’s how to fix them:
- Restart your device: A fresh start often clears the errors.
- Check Network settings: Go to Settings > General > Reset > Reset Network Settings. This refreshes your connection.
- Update your device: An updated iOS keeps everything smooth. Find this in Settings > General > Software Update.
- Sign out and back in: Do this for iMessage and iCloud, ensure the right ID is active.
Dealing With Contacts Receiving Messages From The Old Id
You’ve shifted your Apple ID, but your emails might not get the memo. Here’s a quick guide to avoid mixed signals:
- Inform your contacts: Tell them to start new iMessage threads with your updated ID.
- Update your ID with them: Ensure they have your current Apple ID details.
- Reset iMessage settings: This can be found under Settings > Messages. Turn iMessage off and on again.
- Delete old conversations: Start a clean slate with each contact.
Credit: support.apple.com
Maintaining Digital Privacy And Security
Maintaining digital privacy and security is crucial in today’s connected world. One step in enhancing your digital well-being involves moving away from a shared Apple ID for iMessage. It’s about keeping your personal conversations private and ensuring your security isn’t compromised. Let’s dive into practices that fortify your messaging privacy and security.
Regular Password Updates
One foundational step is to update your passwords regularly. By doing so, you minimize the risk of unauthorized access to your messages. Keep these tips in mind:
- Create a unique password that mixes letters, numbers, and special characters.
- Change your passwords every three to six months.
- Never reuse old passwords.
- Use a reliable password manager to keep track of your credentials.
Utilizing Two-factor Authentication
Two-factor authentication (2FA) adds an extra layer of security. If someone tries to access your iMessage, 2FA safeguards your account with a second form of identification. Here’s how to enable it:
- Go to Settings on your iOS device.
- Tap your Apple ID at the top.
- Select Password & Security.
- Tap Turn On Two-Factor Authentication.
With 2FA, even if someone discovers your password, they won’t be able to read your messages without the verification code sent to your device.
Frequently Asked Questions
To change a shared Apple ID, sign out from all devices and create a new Apple ID. Sign in with the new ID for personalised use. Share purchases with Family Sharing if needed.
How Do I Stop Two Iphones From The Same Apple Id Receiving The Same Imessages?
To stop receiving iMessages on both iPhones with the same Apple ID, go to ‘Settings,’ tap ‘Messages,’ and switch off ‘iMessage’ on one device.
How Do I Stop Sharing Messages Between Apple Devices?
To stop sharing messages across Apple devices, disable iMessage on each device by going to Settings, tapping Messages, and turning off iMessage.
How Do I Separate Iphones On The Same Account?
To separate iPhones on the same account, create a new Apple ID for the other device, then sign out of the current account on that iPhone and sign in using the new Apple ID.
Conclusion
Navigating the transition from a shared Apple ID for iMessage is simpler than it seems. Step by step, take charge of your communication privacy. Remember, individual Apple IDs ensure personalized experiences. Embracing change can enhance your digital life while securing your messages.
Ready for a seamless switch? Start now and enjoy the freedom!